GifIt is a desktop application that allows users to record GIFs from their desktop, webcam or a built in white board. This application is built with Electron, React and Node and is available for Windows (there is a MacOS version compiled in the repository but I haven't been able to test it yet.) My aim for this project was to reverse engineer ScreenToGif, a popular application built with .NET and written in C#. I was able to build features by playing around with the original version and through a lot of trial and error. This project is not meant for distribution, but is a showcase of my problem solving skills and general JavaScript ability.
Recording
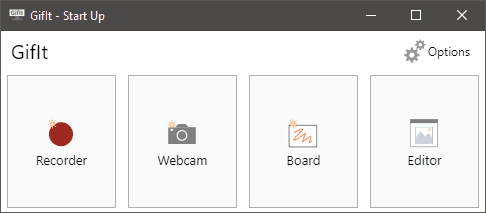
GifIt ships with three separate recorders, the Desktop, Webcam and White Board recorders are accessed through the Start Up window.
Desktop Recorder
The Desktop Recorder captures a series of images that can later be editted an encoded into a GIF. Possible use cases of this feature are to display the use an interactive component, record an animation or to demonstrate a step by step tutorial. Recently, I designed my own version of the classic game Minesweeper. The Desktop Recorder allows me to select the specific region of the screen I want to record so I can show off my skills as both a developer and as a sweeper of mines.

Images are captured by using setInterval to repeatedly fire a function at a user set framerate. The Electron desktopCapturer exposes a video stream which is sent through an HTML video element and drawn to a Canvas element. The Canvas API has a toDataURL method which is used to get the image data on each iteration of the interval. A reference to the setInterval is stored in a React ref so the recording process can be paused and resumed. The image data is stored in an Immutable list until the recording process is stopped. As each frame is captured the recorder also keeps track of the elapsed time and can listen for mouse and keyboard events. Each frame of the image data is saved as a PNG file in a new project directory. A JSON file containing important data such as the width, height and date of the recording as well as the filename, duration and user input data from each frame is also saved to the project directory. When the recording stops the JSON and PNG files are wrote to disk using standard Node APIs.
Editor
The Editor has a multitude of features. This is where the image files collected by the various recorders can be editted, deleted or encoded into a GIF. When a recording ends the Editor automatically opens a new project. The layout is intuitive with a row of thumbnails acting as navigation at the bottom of the page. The main portion of the screen is where the current image is displayed. The top of the Editor uses a ribbon style menu with multiple tabs each containing multiple commands. Most of these commands require some degree of user input and interaction which takes place in an animated drawer that slides in and out from the right hand side of the screen. Other basic features include playback controls and zoom.
Selection
Many of the Editor features involve manipulating one or more image. Multiple images can be selected at a time by using the standard Ctl/Cmd and Shift key modifiers. Holding Ctl/Cmd while clicking a thumbnail adds that thumbnail to the current selection. Holding the Shift key adds all thumbnail from the nearest selection through the current selection. Ctl/Cmd + A selects all thumbnails and Ctl/Cmd + Delete will delete selected thumbnails.

Zoom
The foundation of the Editor is HTML Canvas. The main section is actually comprised on 5 Canvas elements layered on top of each other. When the Editor loads a new project the JSON configuration file is read from every project directory is read into memory. Any project can now be opened via the Recent Projects menu. The Recorder saves the name of the directory it just created as state so when the Editor comes across that JSON file it uses it compute various settings. The width and height of the images are used to determine the dimensions of the thumbnails and the inital zoom level of the Canvas context. The absolute paths to all the images are stored as an array in state and accessing each one is accomplished by matching the index of selected thumbnail to the array. The first or bottom Canvas is the where the actual image is drawn.
The snippet of code in charge of drawing the main image in the Editor.
useEffect(() => {
  if (imageIndex !== null) {
    // set the scale or zoom
    ctx1.scale(scale, scale)

    // create a new image
    const image = new Image()

    // when image loads draw to ctx1
    image.onload = () => {
      ctx1.drawImage(image, 0, 0)
    }

    // add hashModifier to trick cache on image changes
    // needed because filename remains the same but imagedata is overwritten
    image.src = images[imageIndex].path + hashModifier
  }

  // dependencies
}, [images, imageIndex, scale, hashModifier])
The scale, zoom level can easily be changed through various parts of the user interface. A React Hook is used to watch for changes in the scale value and the imageIndex. Whenever a change is detected the image is redrawn. A hashModifier (I used the current timestamp) is added to the end of the image url to trick the browser cache. Whenever images are altered without the page reloading the browser tries to conserve requests via caching. Without this trick many images show up empty or not updated without a page reload. This useEffect hook is re-run any time one of its dependencies change.
Playback
Playback is useful to get an idea of how the eventual GIF will look as it plays. The duration of each frame is recorded and saved in the project's JSON file making this approximation of a GIF in the Editor is possible. Duration is a number in milliseconds and is based on the initial framerate set by the user. The playback controls are presented in the bottom right corner of the screen and in the main menu. The available commands include play/pause, previous/next frame and first/last frame. A Boolean value representing whether the project is playing is kept in the Editor state. Another useEffect hook is triggered any time the playing or imageIndex state is changed. Remember, the imageIndex controls which image is displayed in the Editor, so increasing this by one shows the next image. The hook is built around setTimeout and if the playing variable is true the imageIndex state is increased by one using the duration of the current frame as the delay. When the setTimeout executes the hook is triggered again and the previous timeout is cleared. Each iteration checks to see if the imageIndex is the last one in the array, and if it is the value is reset to 0. This creates the looping effect.
useEffect(() => {
  // keep track of setTimeout
  var pid
  // user clicked play button
  if (playing) {
    pid = setTimeout(() => {
      setImageIndex(x => (x === images.length - 1 ? 0 : x + 1))
    }, images[imageIndex].time)

    // user clicked pause button
  } else {
    if (pid) {
      clearTimeout(pid)
      setSelected(selected.map((el, i) => i === imageIndex))
    }
  }
  return () => clearTimeout(pid)
}, [playing, imageIndex])
The image below is a GIF of the Playback features in action. When the play button is pressed the Editor cycles through the frames. Notice that duration and index of each frame is displayed below each thumbnail. When the imageIndex changes the corresponding thumbnail is scrolled into view and highlighted. As a side note, this game is built into Google Chrome and appears when there is no internet connection. To access the game anytime type chrome://dino into the search box.
GIF Encoding
The ability to encode GIFs is a crucial feature of the application. Encoding is the process of writing a file that conforms to the GIF Specification based on the images and durations captured by the various recorders. GifIt takes two separate approaches to encoding GIFs. The default approach uses a library I wrote called Gif Encoder 2. I built upon the existing JavaScript GIF encoding libraries by adding optimizations and the ability to use an additional algorithm. As a GIF is encoded each image is analyzed and reduced to a palette of at most 256 colors. Each pixel in the original image is then mapped to a color from this palette. There is also a compression process that takes place to reduce the file size. My encoder adds the ability to reuse color palettes when consecutive images are similar. This can reduce overall process time. I also added the Octree Algorithm which takes a little more time on average, but also reduces the output file size.
Example from the Gif Encoder 2 documentation creating a GIF from a directory of image files. This is essentially what takes place in the application.
const { createCanvas, Image } = require('canvas')
const { createWriteStream, readdir } = require('fs')
const { promisify } = require('util')
const path = require('path')
const GIFEncoder = require('..')

const readdirAsync = promisify(readdir)
const imagesFolder = path.join(__dirname, 'input')

async function createGif(algorithm) {
  return new Promise(async resolve1 => {
    // read image directory
    const files = await readdirAsync(imagesFolder)

    // find the width and height of the image
    const [width, height] = await new Promise(resolve2 => {
      const image = new Image()
      image.onload = () => resolve2([image.width, image.height])
      image.src = path.join(imagesFolder, files[0])
    })

    // base GIF filepath on which algorithm is being used
    const dstPath = path.join(
      __dirname,
      'output',
      `intermediate-${algorithm}.gif`
    )
    // create a write stream for GIF data
    const writeStream = createWriteStream(dstPath)
    // when stream closes GIF is created so resolve promise
    writeStream.on('close', () => {
      resolve1()
    })

    const encoder = new GIFEncoder(width, height, algorithm)
    // pipe encoder's read stream to our write stream
    encoder.createReadStream().pipe(writeStream)
    encoder.start()
    encoder.setDelay(200)

    const canvas = createCanvas(width, height)
    const ctx = canvas.getContext('2d')

    // draw an image for each file and add frame to encoder
    for (const file of files) {
      await new Promise(resolve3 => {
        const image = new Image()
        image.onload = () => {
          ctx.drawImage(image, 0, 0)
          encoder.addFrame(ctx)
          resolve3()
        }
        image.src = path.join(imagesFolder, file)
      })
    }
  })
}

createGif('neuquant')
The second approach to encoding involves using FFmpeg, a cross platform audio/video library. FFmpeg must be installed on the user's machine for this to work. The application will check to see if the executable is in the PATH variable when it loads. The user can also manually enter the path in options. Node has the ability to run FFmpeg as a child process and the resulting GIFs are produced much faster and at smaller sizes than when using the JavaScript implementation. Getting this method to work was a little tricky and I wouldn't call FFmpeg beginner friendly.